Pages

Showing posts with label Martha Stewart. Show all posts

Sunday, October 25, 2009

Photoshop Tutorial - Word Art

6 comments
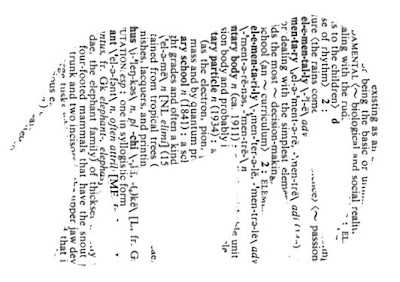
Here is the word art I made yesterday. I am using Photoshop CS3. Except for the spaces in the text of his legs, I am quite happy with him. I actually scanned the page in a dictionary that had the word elephant on it.


Shall we begin:

Open a new document to begin. I chose to open a standard letter size: 8.5" x 11" as I thought it would be easy to work with this size.


Open the text file you are going to use. I scanned the page of the dictionary that had the word elephant on it.


Select > All (Command-A), Edit > Copy (Command-C). Go to new document and Edit > Paste (Command-V).


Open the document that has the picture to which you are going to clip the text. In my case it is a template of an elephant from Martha Stewart.


Your picture may be ready to either copy and paste or drag and drop into your working document, but for mine I only wanted the large elephant so I used the rectangular marquee tool to select him and then Edit > Copy and Edit > Paste him into the working document.


As you can see that is one big elephant. At this point I have two choices: I can make the elephant significantly smaller and leave the text in this orientation and then go on to the next step or I can orient the text in the other direction and then make it work. I chose the latter. To change the orientation of the text, first make sure you are on the text layer in the layers palette and then Edit > Transform > Rotate 90ยบ CW.


You now have the choice of using the Transform tool to make the elephant smaller or to make the text larger. I chose to make the text larger.

Making sure you are still on the text layer, Command T (or control T for PC). This is the same as going under the Edit menu and choosing Transform. I try to use shortcuts whenever possible. This significantly cuts down on the "work".


When you do this, if you can't see the corner handles, Command-0 (that is a zero) will show the bounding box. To make the text larger and constrain proportions, hold down the Shift key as you drag from a corner. If you want to transform from the center, hold down both Shift and Option (Alt on a PC). Get the text the size you want and then either double click within the bounding box or go up on the menu bar and click the check mark to accept the transformation. Then making sure you have the Move tool in the tool bar selected, you can move the text behind the elephant until you are satisfied with its placement.


We are almost there. Now you need to move the text above the elephant in the layers palette. To do this simply click on the layer you want to move and holding down the mouse drag it up. You could of course click on the elephant layer and drag it down to achieve the same layer order.


Now to see the magic begin, hover your mouse between the text layer and elephant layer and hold down the Option (Alt on PC) key until you see the cursor change. At that point, still holding down the Option (Alt) key click between the layers. This creates a clipping mask. I think you could also find the clipping mask option under the layer menu, but I am a big fan of shortcuts.

Now you need to flatten the image so that you can remove the grey of the template without losing the elephant shape. Depending on what you chose to clip to, you may not need to do this step. At the top of the layers palette on the right is a little fly out menu. You can see it in the image below. Select Flatten Image.


Almost done. Now get the magic wand tool and click in the space between words where the gray color resides. This selects all the gray in the template. Then Delete.

Hey, either nothing happens or my background just changes color!!!!

Look in the layers palette. Is this layer the background layer and does it have a lock on it?  Double click on the layer and when the box appears just click OK.

Now when you hit delete, the background color goes away.


Here are some options for you. If you want to save this elephant on a transparent background so that you can use him in other projects, you could crop him and then Select Save As.... and save it as a PNG file. I want a background behind him for today's lesson, so I will put a layer behind him and fill it. To get a layer under the layer on which you are working hold down the Command (Control on PC) key as you click on the "add a new layer" icon at the bottom of the layers palette. If you don't use the shortcut and just click the add a new layer icon, a new layer is added above the elephant - no problem - simply drag the new layer beneath the elephant and then Edit > Fill it with the color of your choice. I chose white.


Now I am going to choose the Crop tool and get rid of some of the white around him so that I can save this file.


Before I save this image, I am thinking about what I am going to use it for - I am going to post it online, so I select Image > Image Size and change the resolution to 72 ppi.


Okay, I am going to save this file. File > Save As.... and choose JPG as the file type. And I am done.


Here is one more time! Ta Da!

Of course, I have been thinking the whole time I have been working on this tutorial - what if at the very beginning I had selected the elephant and changed the selection to a path. Could I then just type in the shape and get the same idea with a different look? Stay tuned - I may have to try this.

But, for now, it is time to get it in gear.

See you,


Monday, October 5, 2009

Photoshop Addiction

6 comments
I had a request to tell how I made the two bird pictures (see previous post) using the idea from the Martha Stewart video and I am happy to share.

I downloaded the bird template from the Martha site. I had some fabric backgrounds that I scanned into my computer. I chose a background and then first placed the bird in the center and filled it with a solid color. I gave it a name and saved it using Save As... and then without closing the file, I selected the bird and then went to Select > Inverse and filled the outer part with the color that was on the bird in the just saved file. Now the whole canvas was covered with that color. But, with the selection still in place, I again chose Inverse and then just the bird was selected. I deleted the color on the bird to let the pattern on the scanned fabric show through. I then saved that with a different name. I use Photoshop CS3 for all my digital work.

And speaking of PS CS3, I was booted from HughesNet again yesterday for using too much bandwidth within a 24-hour period, so I had all day to play with Photoshop (well, not all day - the whole family was out for dinner last evening and we had a blast!).

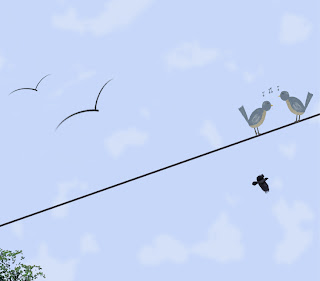
I began with a bluebird using the idea that all things are made up of everyday shapes. I used the elliptical marquee tool to make a circle for the head, an ellipse for the body and then used the polygonal lasso tool to make a rhomboidal shape for the tail.

I rotated the ellipse for the body into place and used the Liquify filter to make the "feathers" at the far end of the tail.

I then added color and used the dodge tool for highlights and the burn tool for shadows as well as separate layers with bits of white on them with reduced opacity for some of the highlights and for the light in the eyes.

When I was relatively happy with him, I made a duplicate of him and used Edit > Transform > Rotate horizontally to make him a friend. I put them both on a wire and used music symbols to signify their conversation.

I used a brush to make the birds flying off to the left and used a vector drawing of the crow that I had on my computer for the crow.

I used the Filter > Render > Clouds to make the sky and then played with the colors and blending modes until I thought it was somewhat believable.

I added a little bit of treetop to the bottom left and Voila!

I have a yearly physical this morning so am planning to begin my day without coffee or breakfast so that when I get the order for blood work, I can have it done while I am in town. Once I get home and eat and have coffee I will make my trip to the post office to send out my Pay It Forward goodies that are already in addressed bubble envelopes.

I am planning to get started on the puzzle pieces after that and will share my progress tomorrow. I am hoping to get word today that I can share my secret project with you and if that is the case I will also share that either later today or tomorrow.

I guess I'd better go get in the shower and begin my day.

Bye!


Saturday, October 3, 2009

Digital Art 3

5 comments
I found a nice link to a video on Martha's site with a guest doing fabric painted silhouettes and I thought it might be fun to try this as a digital project. I would probably like the "real" one better because of the texture, but for now this was fun and I really like how it turned out.


I am definitely try this with fabric and paint - uh oh! I think my list of project to dos is taking over my art room.

Today I hope to make 5 more post cards to send to the new Postcrossing addresses I've been given, send out my Pay It Forward obligations from March of this year (you get a year to fulfill the obligation, so I still have time), and start altering the three puzzle pieces that are due to swap at the November get together with the michiganab group.

Better get to work!!

See you,


Monday, July 20, 2009

Wood Scraps

6 comments
I was out in the hubster's workshop the other day and noticed a box full of pieces of wood. I asked if they were for the taking and he assured me they were.

I started with a small piece and decided to make a collage with jungle animals. The first one I tried was using a template from Martha Stewart. Unfortunately, the scrapbook paper designs I chose from my Scrappers' Guide Premier Membership stash were of the same value as the background (my art friend explained that to me). Following up on her suggestion, I put a sepia wash over the background. That seemed to help to make the elephant "pop". I then added the washer around his eye. He's not perfect, but I love him and I am learning.


This is about 5 1/2 " square.

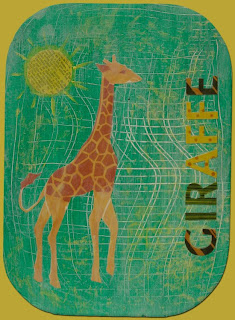
Later that day, I started on a giraffe collage on another piece of wood. I couldn't decide how to finish it so went to bed with him unfinished. I don't know if others do this, but I dreamed about how to finish it. First thing this morning (right after making a pot of coffee) I came in and rummaged around in my alphabet stash and found some lovely chipboard letters to use. I began to plan how to place them when I discovered I only had one F. What to do.....

I scanned the letters into my computer and began to play. I found a font I liked (Stone Sans ....) and made a pattern from each of the patterns on the chipboard letters. I then pasted these patterns into the letters I had typed. I am thrilled with the result. Hope you like him!


This is about 8 x 11 with lovely rounded corners.

Once they are sealed (I can't decide between trying Future Floor Finish or wax.), I am going to attach a serrated hanger to the upper back and they will be good to go. I've never used wax before and don't know what to expect. I'll have to do some researching and hemming and hawing before I decide.

I am tutoring at 2 pm and then getting my hair trimmed. My 31st anniversary is Wednesday and the hubster is taking me to Darryl's for dinner.

I mentioned Scrappers' Guide and provided a link above. If you are using or wishing to use Photoshop or Photoshop Elements and wish you knew more, Linda Sattgast is the person I would send you to. I had no idea how to use layers, etc. until I found her. You really should check her out.

See you tomorrow!