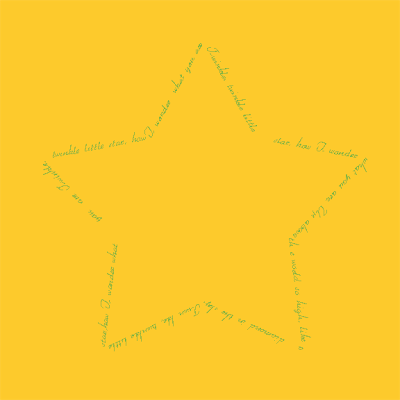
I've been asked by several readers to do a tutorial that shows how to put text on a path. I hadn't played with that aspect of Photoshop for a long time and it was such fun to work with it again. I had forgotten just how simple it is and how spectacular it looks when you are done.
File > New
I generally use an 8 in x 8 in size and then crop it as needed when I am finished.
Select the custom shape tool and in the drop down menu in the options select your shape. I chose the star. The most important step at this point is to make sure you choose the middle of the three options on the far left of the options bar. If you hover over it, it says "Paths". This is the one you want. It is circled in red in the screen shot below.
Draw out your shape. If you hold the shift key, you can constrain proportions and if you hold down the space bar you can move the path as you are drawing it. Of course, you can move this after we are all done as well.
Select the horizontal text tool.
As you bring the cursor toward your shape, you will see the cursor change from a bar with a short horizontal line on it to a bar with a curly shape on it. When you get this cursor, it is time to click and begin to type.
I had forgotten that screen shots don't include the cursor, so I've tried to draw how the cursor looks when you are ready to type on the path.
When I've finished typing, I like to make sure I am on the Move tool in the tool bar and then I open the Character palette and making sure I am on the text layer I highlight the name of the font and then I use the up and/or down arrow on the keyboard to try out different fonts until I get what I like. I can also change the size of the font in the Character palette.
Here is my finished product:
When I was satisfied with the font and size, I filled the background with a bright yellow and then used the Character palette to change the color of the text until I liked it.
You know me well enough by now to know that I am not going to just stop when I am done with the tutorial. There are any number of ways to get a path, so let me show you a couple more.
The top line was made using the freeform pen tool. You don't get the bezier curves that many of us are intimidated by, you just "draw" with the freeform pen tool to make any shape you like.
The square and circle shapes were made using the marquee tool. With this, you simply draw out your shape, then go to the paths palette and use the drop down menu to select "Make Work Path".
You can actually make a path out of anything you can make a selection out of. For example, I have bird brushes that are so cute, I just had to try it using a brush.
I selected my brush tool and chose one of the cute little birdy brushes. I made a new layer above the background. I need this little guy on his own layer so that I can make a selection out of him. I "stamped" just once on the background. Color doesn't matter because I am only going to use the outline to make a path.
However, I do notice one problem. It is going to be very difficult to wrap text around those little legs. So I am going in with the eraser tool and removing them.
Now comes the fun part:
Make a new blank layer above the birdy layer and with this new layer active, hold down the Command key (on a PC use the Ctl key) and click on the thumbnail of the little birdy in the layer below. See the screen shot below:
Click on the paths tab and use the drop down menu to "Make Work Path" like we did when using the marquee (about four screen shots above here). Then go back to your layer tab and throw away the layer right below, the one with the little birdy on it. You are left with just the path.
Now get the horizontal type tool and hover over the outline until you get the "curly" cursor and begin to type. You can then use the Character palette to fine tune it if you like. You can also use the Path Selection Tool to move your text around, but I find that more difficult, so I use the Character palette.
Here is my little birdy all done:
I added the beak using the "greater than" symbol and the legs using the character i.
I added the eye using a round brush.
I sure hope you have liked this tutorial. I know I had a great deal of fun writing it.
As usual, if you find any step in this process difficult or my instructions seem difficult to follow, please leave me a comment or send me an email and I will try to make it more clear.
Gotta go!


